Thursday, May 13, 2010

Buttered Rosemary Rolls

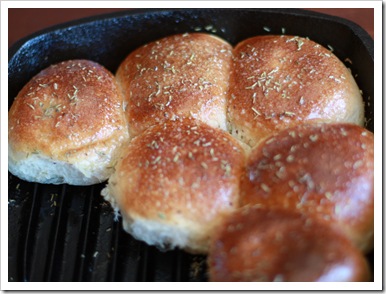
These rolls were added by Ree over at Pioneer Woman and Tasty Kitchen.  They are seriously, seriously good!  Betcha can’t eat just one!  Just ask my son! 

They are delicious and easy… and we will be having them again!!

IMG_3549

Buttered Rosemary Rolls

Ingredients

  • Frozen, Unbaked Dinner Rolls
  • Melted Butter, Regular, Salted
  • Fresh Rosemary, Coarsely Chopped
  • Coarse Sea Salt

Instructions

Spray a small iron skillet with cooking spray (or coat with olive oil). Place frozen rolls in the skillet, leaving plenty of room for rising. Cover and allow to rise for several hours.

After rising, brush rolls with melted butter.

Sprinkle on chopped rosemary. Brush with additional butter. Sprinkle with coarse sea salt.

Bake according to roll package directions (usually 400 degrees for 15 to 20 minutes), until rolls are a deep golden brown on top.

Serve skillet on the table.

Chicken Pockets

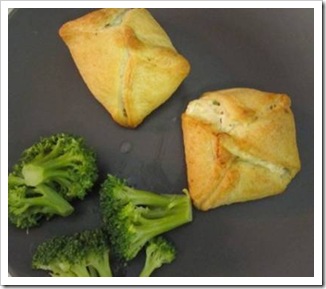
These were so delicious… and we all kept coming back for more!  Shutterbug added it to Tasty Kitchen!  Another favorite of ours so far!

Chicken Pockets

clip_image002clip_image003

Ingredients

  • 1-½ pound Cooked Chicken
  • 2 packages (8 Oz. Package) Refrigerator Crescent Rolls
  • 8 ounces, weight Cream Cheese
  • 6 Tablespoons Butter Or Margarine
  • 4 Tablespoons Minced Fresh Chives, Or More To Taste

Preparation Instructions

Preheat oven to 350 degrees.

Bake the chicken. White meat or dark, your choice. Just be sure to remove the skin and bone if using that type of chicken. I like to bake mine with a heavy sprinkle of rotisserie seasoning and a decent amount of minced garlic just so the chicken has flavor. Allow to cool and shred or chop up. (I didn’t count this in the prep time for this recipe.)

Soften cream cheese (reduced fat is fine) and butter in a mixing bowl. Once softened, mix together well. (I just use my handheld mixer for all ingredients.) Mix in the minced chives. Mix in the chicken. Salt and pepper to taste. Set this aside and let the flavors get friendly while you prep the crescent rolls.

Open up both tubes of crescent rolls and unroll them onto a clean counter. They come in 4 rectangles, 8 triangles per can. Pinch the triangles together tight so as to form a solid rectangle. Take each rectangle and cut in half to create a square. You should end up with 32 squares total. Stretch each square just a little bit. Take a larger spoonful of chicken/cheese mix and place it in the center of the square. Fold opposite corners into the center, pinching together. Pinch any seams gaping open closed. Place on a non-greased cookie sheet and bake for 20 minutes or until golden brown. Serve 4 per plate with your favorite vegetables.

Note: if you’re looking to make this super quick or even easier, you can use flavored cream cheese (onion and chives or whichever you prefer) and canned chicken (drained) if you prefer. I would add a little minced garlic to it just so its got good flavor. A rotisserie chicken from the grocery store works perfect and makes this dish even easier!

Waffles!! Easy Waffles!

These turned out great too!  And, they do freeze well!  I tried it and we had them the next day too!  The kids loved them!

This recipe came from 2kidsandtired(Holly) over at Tasty Kitchen!

Easy Waffles

Ingredients

  • 3 whole Eggs
  • 1-½ cup Buttermilk Or Sour Milk
  • 1-¾ cup Flour (I Use 1 Cup White And 3/4 Cup Wheat)
  • ½ cups Vegetable Oil
  • 2 teaspoons Baking Powder
  • 1 teaspoon Baking Soda
  • ½ teaspoons Salt

Preparation Instructions

Mix it together and make yummy waffles, according to the directions for your waffle maker.

Freeze the extra waffles and just pop them in the toaster to reheat them.

Paula Deen Crock Pot Macaroni and Cheese

This one I found over at Recipezaar.  It was submitted by GiddyUpGo, and the number is 257276! 

I wasn’t quite sure about this recipe… but I tried it anyways!  And, guess what!  It was delicious!!  The kids loved it, I enjoyed it, and Brett liked it too!  So, it is a keeper, and it was definitely easy!  Just make sure you stir it about every half hour… or turn it to the lowest setting you can!  My crockpot heats fast and it started to toast the noodles on the one side!

Ingredients
Directions
  1.  
    Boil the macaroni in water for six minutes. Drain.
  2.  
    In a medium saucepan, mix butter and cheese. Stir until the cheese melts.
  3.  
    In slow cooker, combine cheese mixture and add the eggs (I omitted the eggs), sour cream, soup, salt, milk, mustard and pepper. Add the drained macaroni and stir again.
  4.  
    Cook on low for 2 1/2 hours, stirring occasionally.

I didn’t have any condensed cheddar cheese soup on hand, so I substituted Velveeta instead.  It still turned out great!

Creamy Chicken Alfredo

Here is another recipe from Freezer Dinner!  This one is delicious and easy too!  We have even used the frozen one already and it turned out just as good!  The kids even loved this one too!!  So, go try it!

Creamy Chicken Alfredo

Yield: 8 servings

2 packages Italian dressing mix*

1½ cups water

2 cans (14 ounces each) cream of chicken soup

2 packages (8 ounces each) cream cheese

2 to 3 tablespoons garlic powder

salt and pepper to taste

4 pounds boneless, skinless chicken breasts

1 package (12 ounces) penne or spiral pasta

1.   With a hand mixer, beat together the Italian dressing mix, water, cream of chicken soup, cream cheese, and garlic powder in your crock pot.     Place chicken in the slow cooker and make sure the chicken is covered in the sauce mixture. Cook 3 hours on low. When done, whisk in 1 cup of milk to thin the sauce. Remove the chicken and shred it with two forks. Place the shredded chicken back in the sauce and salt and pepper to taste.

2. Meanwhile, cook pasta in boiling water for 12 minutes (al dente). Rinse with cold water in a strainer. Freeze pasta flat on a baking sheet for 1 hour. Remove from freezer and place two cups of frozen pasta in each sandwich-size zip-top bag.

3. When the sauce has cooled, place 2 cups of sauce in separate sandwich-size zip-top bags, label, and stack next to frozen pasta bags in freezer.

To serve: Remove the plastic bags and defrost frozen sauce in microwave for 2 minutes on high

There should be some ice chunks left in the sauce. Heat a skillet on medium-high heat. Drop one bag of frozen pasta and one bag of defrosted sauce into a skillet on the stovetop. Add 4 tablespoons water and cover with a lid. Cook for 10 to 15 minutes or until sauce is warm and creamy. Serve with crusty garlic bread and a salad. Top with fresh Basil if you have some on hand. Delicious!

*If you don’t have a Italian dressing packet mix you can make this one from scratch:

Italian dressing packet mix (1 package): 1 tablespoon parsley, 2 teaspoons salt, 2 teaspoons sugar, 1 teaspoon garlic (bottled minced is fine or fresh), 1 teaspoon onion powder, ½ teaspoon basil, and 1/4 teaspoon red pepper flakes

Hawaiian Teriyaki Chicken

Have you ever been to Teriyaki Stix?  This tastes amazingly like it!  My kids and husband loved it!  And, of course I did too!!  Next time though… I think I would make a little more sauce to put over the top of it; that would make it even better!

This recipe came from Jenny Stranger over at Freezer Dinner!  Check out her fun site to find some other delicious and easy meals!!

Hawaiian Teriyaki Chicken
Yield: 6 to 8 servings
2 cups soy sauce
2 cups water
2 cups brown sugar
2 cups white sugar
1 teaspoon sesame oil
1 tablespoon minced ginger
1 green onion, chopped
3 cloves minced garlic
3 pounds chicken tenders or breasts,
1 keilbasa sausage sliced into 1-inch strips (optional)

Place all ingredients except chicken and sausage into 2
large zip-top bags. Stir to create marinade. Add the raw chicken and sliced sausage
squeeze all the air out of the bags. Label and
freeze. (Marinate the meat for at least 15
minutes in the fridge, or up to 3 months in
the freezer.)
To Serve
Defrost frozen meat and marinade in the microwave and
then cook together in a hot skillet until chicken is cooked through (5 minutes on each
side.) Serve with rice. To turn marinade into a sauce, bring it to a boil on the stove and add 3
tablespoons cornstarch mixed with ½ cup cold water. (Mix the cornstarch with water before
pouring it into the sauce or it will be lumpy.) Stir until sauce thickens, and then pour on
rice.  Garnish with sesame seeds.
*Another option to make this recipe is to place all ingredients in a
slow cooker and cook on low for 3 hours.
Serve with rice and freeze
leftovers

Wednesday, April 7, 2010

Cake Pops

I was down at my sister in laws house a few months ago, when we went to a girls’ night!  A woman there served these, and told me to check out Bakerella’s site.  So, I came home and did!  These are so much fun… and easy!

Madisyn just had a birthday, so I thought they would be perfect for her party.  And, we had enough left over that I just threw them in the freezer for a week and served them again at our Easter dinner!  Wonderful for me and everyone that got to enjoy them!

So… here is the easy recipe, and check out Bakerella to find some more fun ideas!

Cake Pops

1 box cake mix (any kind you desire)

1 container of frosting (cream cheese is what she used)

Skewer sticks, popsicle, or sucker sticks for the balls

Melting chocolate or bark

Mix the cake mix according to directions, (or if you prefer to make one from scratch… have at it!)  Bake and cool completely.  Crumble the cake in a bowl and mix with frosting.  Roll into balls and place on cookie sheet.  Freeze the balls until hard.  Place sticks in them and then dip in melted chocolate.

IMG_0819IMG_0818-1


Enjoy!

I made rainbow cake with rainbow chip frosting and strawberry cake with cream cheese frosting.  I think it would be good with mint chocolate, chocolate/strawberry, or chocolate chips inside!  Just play and discover what is good to you!  Have fun!

Taco Soup

I was craving it one day… no, I am not pregnant!  Can’t a girl have some cravings? :)  So, I called my mom and got the recipe.  Yes, she had made it before… but, I hadn’t!  It is wonderful on cold days, and any day really!  I love it! 

Taco Soup

1 pound ground beef thawed

1 package taco seasoning

Cook beef and and taco seasoning according to instructions

Mix:

2 cans kidney beans

2 cans corn

2 cans tomato sauce

2 cans whole tomatoes (optional)

Cooked ground beef

Don’t drain the corn or beans.  Mix all together and heat through.  Serve with tortilla or frito chips, sour cream, cheese, or olives. 

Thursday, March 4, 2010

I haven't quit... I promise!

I don't know that anybody cares, or reads this... but I haven't quite trying new recipes.  We have tried a new sloppy joe recipe, fish batter recipe, and I don't remember what else!  I just know that they weren't really all that good, so I didn't post them!  At the end of this year I want to make a cook book out of this, so I really only want the ones on here that I will put in the book!  So, that is my explanation for no new recipes! 

Tuesday, February 2, 2010

Bacon-Wrapped Chicken

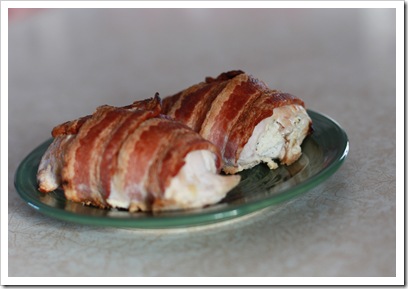
Here is how I describe this chicken…DELICIOUS!!  I loved it!  I am not a gourmet cook, or even a great cook, but it tasted like something you could get in a good restaurant!  I loved the cream cheese filling, the tender chicken, and the bacon to bring it all together!  Even my kids liked it… and that is saying something since they won’t usually eat meat!

Plus, here is the best part… it really wasn’t hard to make, so that made it even better!

Here is the recipe!

IMG_7693

Bacon-Wrapped Chicken                                                               MarlaKaye Skinner-Taste of Home Cooking School Magazine

6 boneless skinless chicken breast halves (4 ounces each)                  

1 carton (8 ounces) spreadable chive and onion cream cheese

1 tablespoon butter

Salt to taste

6 bacon strips

Flatten chicken breast halves to 1/2 inch thickness.  Spread 3 tablespoons cream cheese over each.  Dot with butter and sprinkle with salt; roll up.  Wrap each chicken breast with bacon strip.

Place, seam side down, in a greased 13-in X 9-in baking pan.  Bake, uncovered, at 400 degrees for 35-40 minutes or until meat thermometer reads 170 degrees.  Broil 6 inches from the heat for 5 minutes or until bacon is crisp.

Try this recipe… you won’t regret it!!!

Tuesday, January 26, 2010

Chili’s Chicken Crispers

Our family loves Chili’s.  Whenever we go up north, a lot of the time we go there.  And what do we get?  Of course you guessed it, chicken crispers!  I usually get their triple dipper and get 2 of the crispers and one of the southwest eggrolls… which I still need to find a recipe for!  But, we found this recipe on Meemo’s Kitchen.  I love her site!  She has a lot of secret recipes listed!  So, go there if you are craving something and would like to try and make it!
We made these for Brett’s birthday the other day, and I thought they tasted as good as the original!  And of course the honey mustard sauce is delicious too!!!  
Make sure and use the self rising flour too.  We tried this once before with regular flour, and they work… it just tastes like beer batter.  But, if you use the self rising… oh, I can’t even describe it, they are just a little more doughy I guess!  You will have to try them to find out!  Or, go to Chili’s and taste them! 
Also... we cut our smaller that strips.  Ours were more like chunks, like 1 by 2 inches or smaller.  It is just easier for the kids to eat!
And, really sorry about this one, they are really fattening!   I hope I can start finding some healthier recipes to post about, but as of right now we have just been doing what tastes good!!  So if you have some delicious healthy recipes to share, please do!!
Please forgive this picture… I forgot to take some while I was making them, so these are the leftovers!


Chili's® Chicken Crispers
Menu Description: "Strips of hand-battered chicken fried to perfection. Served with sweet corn on the cob, honey mustard dressing and homestyle fries."
Honey Mustard Dressing
2/3 Cup mayonnaise
1/4 Cup honey
2 Tablespoons Dijon mustard
Pinch paprika
Pinch salt
Batter:
1 egg, beaten
1/4 Cup whole milk
3/4 Cup chicken broth (Swanson)
1-1/2 Teaspoons salt
1/2 Teaspoon ground black pepper
1 Cup self-rising flour
6 to 10 cups shortening or vegetable oil (amount required by fryer)
10 chicken tenderloins
1/2 Cup flour
Honey Mustard Sauce:
Combine ingredients in a small bowl. Cover and chill until needed.
Heat shortening or oil in fryer to 350 degrees F.
Batter:
Combine beaten egg, milk, chicken broth, salt and pepper in a medium
bowl. Whisk to dissolve salt. Whisk in 1 cup self-rising flour. Let batter sit for 5 minutes.
Coat chicken pieces with dry flour, then dip chicken into batter. Allow excess batter to drip off, then place battered chicken into the hot oil and fry for 7 to 9 minutes or until golden brown.
Do not overload fryer. Fry 3-4 pieces at a time.
Drain fried chicken strips on paper towels.
Serve with the honey mustard dressing on the side for dipping.
Serves 4 as an appetizer or 2 as an entree.

Thursday, January 21, 2010

My goal for this year...

I don't know about anyone else... but I get tired of the same old things for dinner.  Any one else that way?  I am always saying that I need something new, something good to help feel in the same old mundane things that I cook for dinner now.
So, my goal for this year.  I want to try something new, something different each week.  A new recipe, a new outlook on my dinner menus for the week.  Can I do it?  Good question, but I am going to try!
Now, I know I am starting this a little late in the year... but I did do something new last week, it just isn't worth posting about.  It definitely isn't a keeper on my menu list!
But, this weeks.... amazing!  Delicious! Wonderful!  Sinful!  Okay, maybe I exaggerate a little bit, but not by much!
Have you ever been to Olive Garden?  I love, love, love Olive Garden... yes, I am country girl, I will fully admit to that.  But, I digress!  I always get the chicken alfredo, or just the alfredo... but I also love just their soup and salad.  And, of course the breadsticks... more on those another week.  The soup I usually get is the zuppa... but recently I tried the Chicken Gnocchi... and I loved it!  This week I was craving that soup, so, I looked it up.  And up came this recipe that said it was even better than the Olive Garden.  Well... it had a quite a few ratings, and they were all 4 or 5 star recipes.  I decided to try it!  And, we loved it!  Hence, the  Amazing, delicious, etc...!
So, here is the recipe or this wonderful soup!  If you are looking for a wonderful creamy soup, you gotta try it!  Oh... to give credit where credit is due, I got this recipe off of Recipezaar and it was submitted by Anne G.


Olive Garden Style Chicken and Gnocchi Soup
Serves 8-10(it really does)
35 min/10 minute prep
3-4 chicken breasts, cooked and diced
4 cups chicken stock
2 cups half-and-half (I used Heavy Whipping Cream to make it a little thicker)
1 stalk celery ( I didn't have any celery, and it was still delicious without it!)
1 garlic clove, chopped
1/2 carrot, shredded
1/2 onion, diced ( I just used onion powder... we aren't big fans of onions)
1 cup fresh spinach, chopped (I used frozen, and only half a cup... half a cup is plenty unless you really love spinach)
1 tablespoon olive oil
1 teaspoon thyme ( I only used half a teaspoon, and that was enough too, just depends on what you like)
salt and pepper to taste
16 ounces potato gnocchi
1 tablespoon cornstarch (optional.... I didn't have cornstarch either... geez I need to get to the store.  But, I used 2 tablespoons of flour)

Directions:
1. Saute the onion, celery, garlic, and carrot in oil over medium heat until onion is translucent. (I just used my pot so that I didn't dirty more dishes).
2. Add chicken, chicken stock, half and half, salt and pepper, and thyme.  Heat to boiling, then add gnocchi.  Gently boil for 4 minutes, then turn down to a simmer for 10 minutes.
3. Add spinach and cook for another 1-2 minutes until spinach is wilted.
4. (Heat to boiling and add cornstarch dissolved in 1-2 tablespoons of water at this point if you want a thicker soup).
5. Ladle into bowls and serve! (We also topped it with a little parmesan cheese... your choice)


So... I completely know that this isn't the most healthy meal in the world, but who cares!  Every once in a while isn't going to hurt anyone!  And, of course... it was delicious!

Let me know what you think if you try it out!  Or, if you have any great and wonderful dishes that you want me to try out... please send them to me!  I really hope to expand my cookbook this year with some great recipes!